NitroPack CDN Review: The Fast Track to Website Success – Here’s How! (March 2026)
Welcome to our updated NitroPack review.
NitroPack CDN Review: NitroPack is a performance platform seemingly unlike any other. Its promise is simple – it will apply virtually all possible speed optimizations automatically.
No juggling with more than 5 different optimization tools and technical headaches. Web performance is finally easy.
But can you fix a slow-loading website? And if so, how much can you speed up your website?
In this review, you’ll find out everything you need to know. I’ll break down NitroPack’s features, pros and cons, and pricing.
And most importantly, I’ve included before and after speed tests so you can see the results for yourself.
Table of Contents
NitroPack CDN Review: What is NitroPack?

Is it a caching plugin? An image optimization tool? Or a content distribution network?
It’s a little bit of all three and a lot more.
I like to think of NitroPack as a 360-degree speed optimization platform because it covers all aspects of website performance optimization in one tool.
Normally, if you wanted to speed up your website, you would need:
Next, you will need to configure each tool/plugin. The difficulty will vary.
And, you’ll have to hope that they all behave well together and have no problems with your hosting setup.
But, if you don’t know what you’re doing, you’ll either give yourself a big headache or you’ll have to pay someone to fix it for you.
This is the problem NitroPack is designed to solve.
It deploys all the performance optimizations you need. No coding. Without pulling your hair out in frustration.
NitroPack Performance Data
Let’s face it. This is the main reason you’re reading this NitroPack review, right?
When it comes to website performance optimization tools and plugins, nothing matters more than exactly how much faster your website will be.
I’ll cover specific features in a moment. First, I’ll cover my approach to running these NitroPack tests. Next, let’s dive into the performance data.
Performance Test Methodology
To test the performance of NitroPack, I took my trusty WordPress demo site and used it to run some before and after tests from different locations.
My test site is hosted on WPX Hosting and uses the Kadence theme. To add some “weight” and make the test more realistic, I installed Kadence Blocks and imported one of their site templates. I then added some additional plugins, such as social sharing and SEO plugins for good measure.
WPX Hosting offers its own global CDN, but that is disabled on my test site.
My speed test tool of choice is WebPageTest. It is the best performance testing tool I have tried so far. In addition to offering different metrics for the “load time”, also includes data for the Core Web Vitals Google initiative, which became a classification factor in the search engines in 2021.
Core Web Vitals metrics measure load times as they apply to the user experience, not just a single “load time” metric. Since many optimizations of NitroPack will focus on improving these metrics (for example, by example, inline CSS critical), I think they are another important piece to pay attention to.
For my test setup, I used the following:
I will also run my test site through PageSpeed Insights because I know a lot of people worry about PageSpeed Insights scores. However, you shouldn’t get hung up on scores alone. What really matters is how human visitors experience your site.
As for NitroPack’s configuration, I’m using Ludicrous mode, which provides most of the optimizations automatically. However, you can definitely squeeze faster times out of your site by setting up some of the optional optimizations in your dashboard.
For example, if you have ads, you can turn on the “Optimize Ads” option.
I’ll start with the raw page speed data and then summarize everything at the end of this section:
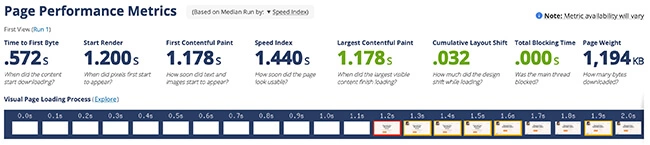
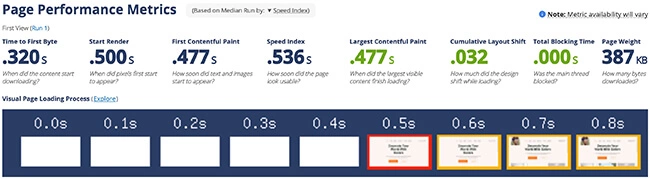
WebPageTest – Virginia, US
No performance optimization (control)
With NitroPack
As a quick note, we’re not seeing much movement on the cumulative design change because my test site isn’t running any lead generation forms or ads. If that were the case, we would probably see improvements in this metric, thanks to CSS optimization functionality and other optimizations running in the background.
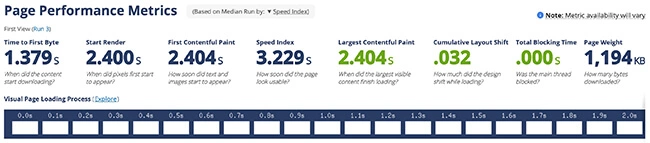
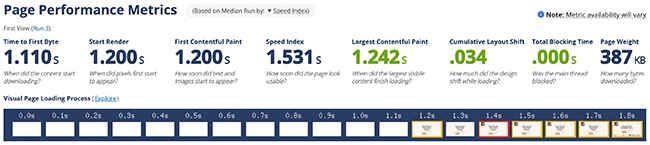
WebPageTest – Mumbai, India
No performance optimization (control)
With NitroPack
Google PageSpeed Insights
Some of the main metrics that PageSpeed Insights offers have been covered in previous WebPageTest.com tests.
So here I’ll just give you the individual PageSpeed scores in case you’re curious.
Without NitroPack
Mobile:

Desktop:
With NitroPack
Mobile:

Desktop:

Test conclusions
Okay, I know I’ve dropped a lot of technical information on you in the previous sections. If you’re not a website performance professional, you may have found it a bit overwhelming. So here are the human conclusions from all that test data:
NitroPack has vastly improved my site’s page load times in all areas:
To help you visualize the comparison, here’s how things look in the Virginia, USA test:
| Before NitroPack | After NitroPack | |
| Time to First Byte | 0.572 seconds | 0.320 seconds |
| Speed Index | 1.440 seconds | 0.536 seconds |
| Largest Contentful Paint | 1.78 seconds | 0.477 seconds |
| Page Weight | 1,194KB | 387KB |
Here is the Mumbai, India test:
| Before NitroPack | After NitroPack | |
| Time to First Byte | 1.379 seconds | 1.110 seconds |
| Speed Index | 3.229 seconds | 1.531 seconds |
| Largest Contentful Paint | 2404 seconds | 1.242 seconds |
| Page Weight | 1,194KB | 387KB |
Note here the huge improvement in load times and page weight. The test site is significantly faster with NitroPack.
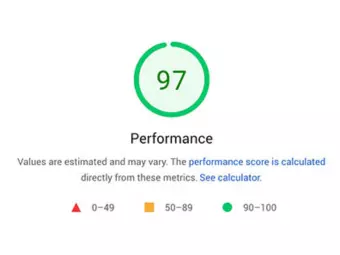
Finally, here are the PageSpeed Insights scores:
| Before NitroPack | After NitroPack | |
| Desktop | 80 | 97 |
| Mobile | 93 | 99 |
All in all, NitroPack passed the speed tests with flying colors. And it delivered significant speed improvements.
But I suspect these figures could be improved further.
For example, even in Ludicrous mode, some optimizations are not active. So by using features like JavaScript deferral and others, you should see more significant improvements in site speed.
It’s also worth noting that my test site is already quite fast out of the box. My host includes default optimizations that most other hosts do not and I was unable to turn them off for this test. So, for other sites, I would expect to see more significant improvements in page speed.
And, although these tests are the fundamental part of this post, I’d like to recommend reading this full NitroPack review to get a complete low-down on the platform.
How does NitroPack speed up your website?
Well, now you know that NitroPack can greatly improve your website page load times. So… how does it do it?
Again, what’s unique about NitroPack is that it offers an all-in-one approach to speeding up your website. Instead of throwing together a collection of various WordPress performance plugins, you can just install NitroPack and you’re done.
Here are some of the main techniques it implements to speed up your site.
NitroPack has several caching systems to improve performance and reduce the load on your server. The two most important are page cache and browser cache:
NitroPack also includes smart features such as cache invalidation, which helps you ensure that cached versions of your content are served to as many visitors as possible. There is also a cache warming function.
If necessary, you can also exclude certain content/resources from the cache. For example, if you have an e-commerce store, you will need to exclude the cart and checkout pages.
A CDN speeds up your site’s overall load times by caching static resources on a network of servers spread around the world (called edge locations).
Then, when someone visits your site, they can download those resources from the nearest edge location, rather than having to go all the way to your site’s physical server.
This CDN goes a long way toward explaining why my test site was so much faster at other locations around the world.
NitroPack’s CDN works with Amazon CloudFront and is automatically integrated into the service.
Images make up about half the average size of a web page, so finding ways to reduce them is a good way to speed up the process.
NitroPack automatically optimizes your images, including converting them to the fast WebP format and slow loading.
It also includes advanced techniques. For example, preventive image sizing and adaptive image sizing.
NitroPack includes many different functions to optimize your site’s code. This includes not only the size of your site’s code through minification, but also how the code is loaded.
First, NitroPack can automatically generate critical CSS for each unique layout, and then defer the loading of non-critical CSS, which will speed up how quickly your content becomes visible (and also increase your PageSpeed Insights scores).
You can also defer render-blocking JavaScript, which achieves the same positive effects as deferring CSS (and is something PageSpeed Insights always yells at you for).
You’ll also find code optimizations for fonts. Including less common techniques, such as font subsetting. This stops those unstyled font flashes when a page loads.
Finally, there are some other miscellaneous improvements such as DNS prefetch and font rendering optimization.
How to configure NitroPack
Now, let’s install NitroPack.
First, you will need to register for a NitroPack account. You can opt for a paid plan or the free plan.
There is also a 14-day money-back guarantee on the paid plans.
NitroPack is compatible with several content management systems. This includes WordPress, OpenCart, and Magento.
There is also PHP SDK and API integration available for other types of websites.
My entire site runs on WordPress, so I’m going to focus on that CMS for this tutorial.
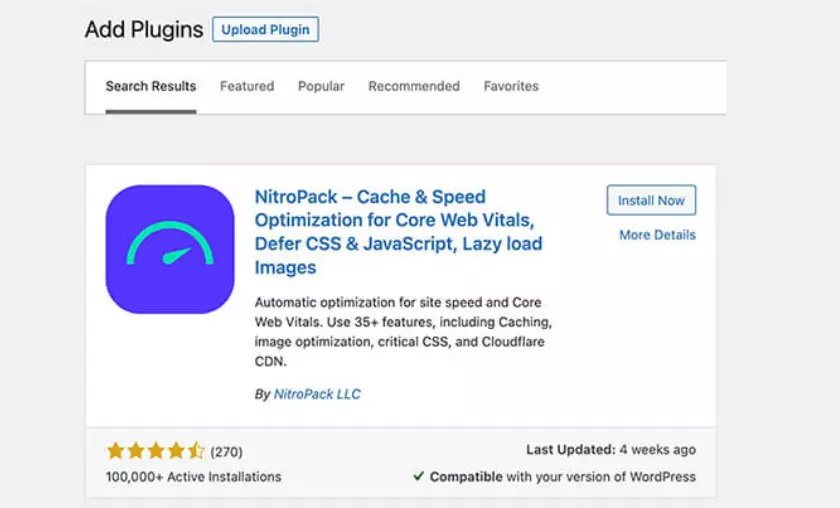
NitroPack has a handy connector plugin to make this process easy.
You can install the NitroPack plugin from WordPress.org or through the WordPress back-end by going to Plugins → Add New.
Next, I just have to connect the button to my NitroPack account:
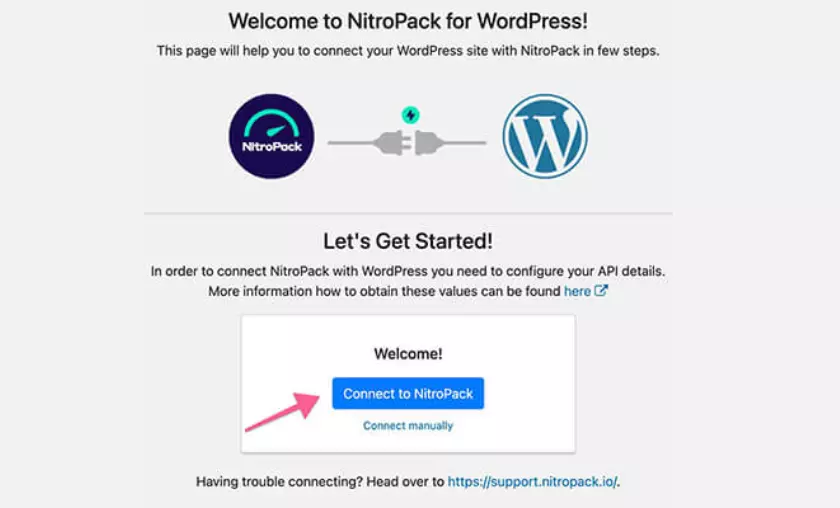
And that’s it, NitroPack is connected to WordPress. Easy, right?
This is one of the main benefits of NitroPack – it’s incredibly easy. I’d even go so far as to say it’s one of the easiest optimization tools I’ve ever used.
But how do you set up NitroPack?
While NitroPack gives you a basic control panel within your WordPress site along with a couple of settings, you’ll manage most things from NitroPack’s cloud control panel, not from your WordPress site.
Here we go.
Adjusting NitroPack’s Settings
The best thing about NitroPack is that you don’t even need to “set it up“. It pretty much works out of the box.
Even if you use the default settings, you’ll see some major improvements in site speed and Core Web Vitals.
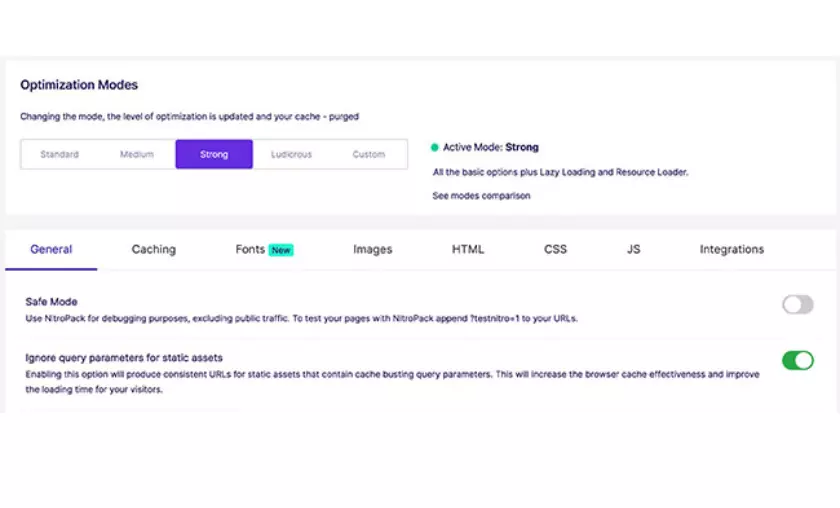
If you want to go deeper, go to the Settings tab of the NitroPack control panel.
You can then choose the level of optimization you want in the Settings slider. Depending on the optimization level you choose, NitroPack will automatically configure some or all of the features I mentioned above.
For example, if you choose Strong (the default), it will include features such as advanced slow loading and font optimization.
If you are a casual user, that’s it! To – you need to go no further than choosing the level of optimization you want.
If you want to go further, you can activate the Ludicrous setting, which will activate more NitroPack features.
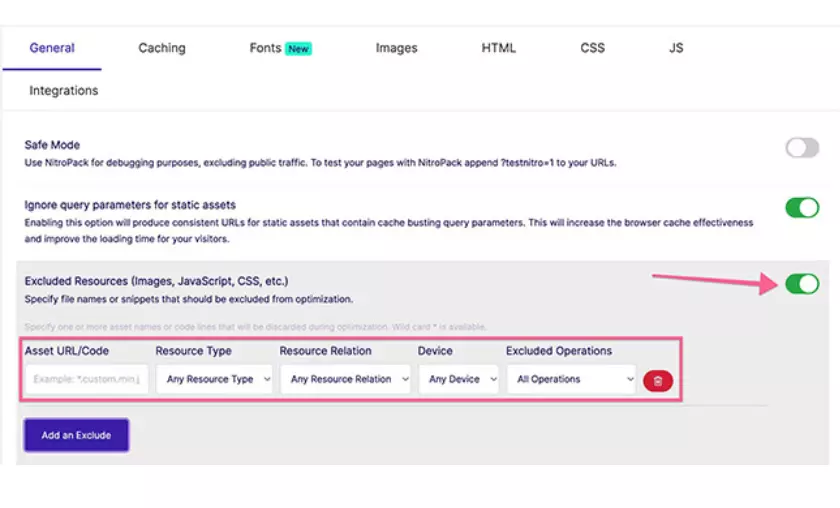
If you want to further optimize your site, you can enable optional settings. Most of them have to do with the inclusion/exclusion of specific content from optimization.
For example, you can exclude certain images or resources, cookies, URLs, etc. This can be useful, for example, if you are a photographer and want the high-resolution images in your portfolio not to be compressed, or if you have a membership site and don’t want registered members to receive cached content:
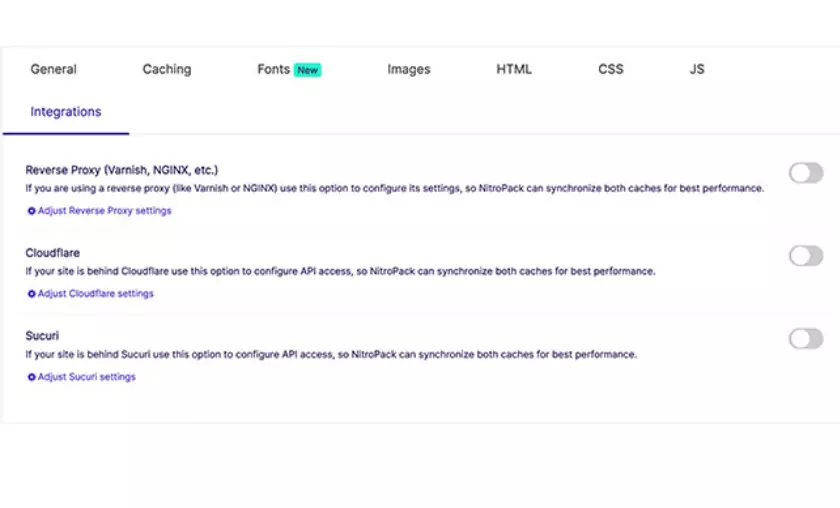
The Integrations tab also helps you integrate with other tools:
NitroPack gives you other areas of the control panel to monitor usage and see which pages have been optimized, but that’s about it as far as configuration goes.
Easy, right?
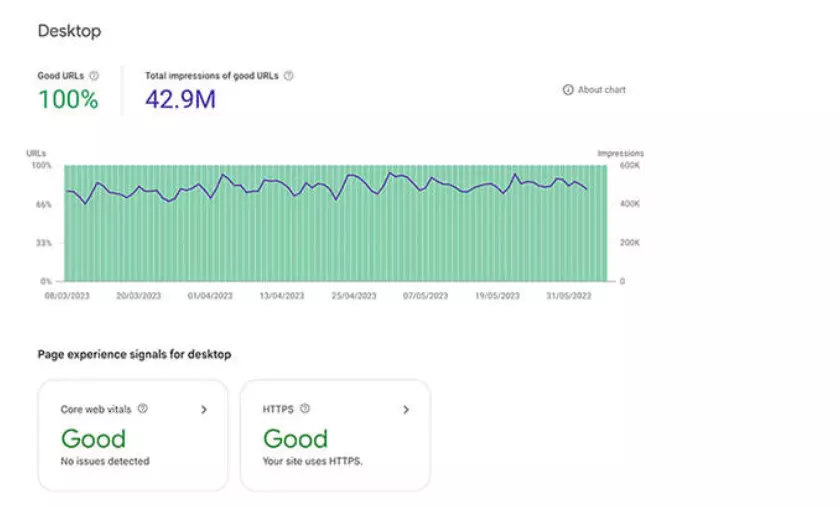
Also, if you’re interested, you can monitor improvements in your Core Web Vitals scores over time in Google Search Console. You can view them under the “Page Experience” tab and the “Core Web Vitals” tab.
NitroPack Pricing
Now, the next important question: how much are all these features going to cost you?
NitroPack offers a limited free plan that will work for small sites, although it does include a NitroPack badge in the footer of your site.
However, you can opt to join as a beta tester to have that badge removed. They will also increase the limits on your free plan.
After that, paid plans start at $17.50 per month with annual billing or $21 per month with monthly billing.
These prices are per site, but you can also contact the sales team for multi-site or agency plans.
There is also a 14-day money-back guarantee in case you need it.
NitroPack Alternatives
NitroPack is somewhat unique in the realm of site speed optimization tools.
Most tools/plugins are designed to cater to very specific feature sets. Therefore, to get the same functionality, you would have to use multiple tools together.
I have included some solid NitroPack alternatives below:
FAQ,s
Can NitroPack be integrated with other tools and services?
Yes, NitroPack supports integrations with other services like Cloudflare, Sucuri, and reverse proxies like Varnish or Nginx. These integrations can complement NitroPack’s performance optimizations and further enhance website speed and security for users.
Can NitroPack help improve Core Web Vitals scores?
Yes, NitroPack’s optimizations focus on improving Core Web Vitals metrics, such as Largest Contentful Paint (LCP), First Input Delay (FID), and Cumulative Layout Shift (CLS). Features like critical CSS generation and JS deferral significantly contribute to enhancing these important metrics, positively impacting the user experience and search engine rankings.
Does NitroPack offer customization options for different website requirements?
Yes, NitroPack provides users with options to adjust optimization levels and enable or disable specific features. The settings slider allows users to choose between standard optimization and more advanced Ludicrous mode. Additionally, users can exclude certain content, resources, or URLs from optimization, providing flexibility to cater to specific needs.
Is there a free plan available for NitroPack?
Yes, NitroPack offers a limited free plan that can be used for small websites. However, the free plan includes a NitroPack badge in the footer. Users have the option to become beta testers to have the badge removed and get increased usage limits on the free plan.
Can NitroPack significantly improve website load times for global visitors?
Yes, NitroPack’s integration with a content delivery network (CDN) ensures that static resources are cached and served from servers located closer to visitors, regardless of their geographical location. This reduces latency and improves load times for global audiences, creating a smoother user experience.
Mike DaVinci HighTechBlogging.com
Mike DaVinci is a skilled content writer with a talent for storytelling. He specializes in creating captivating narratives that engage readers and leave them feeling inspired. His writing has been featured in various publications, including magazines, blogs, and business websites. Mike’s particular interest in human interest stories allows him to uncover the heart of any story and convey it to his readers in an emotional and authentic way. He believes that storytelling is a powerful tool for connecting with people and inspiring positive change in the world.
To read more similar articles, click here
Thanks for visiting our Website. If you appreciate our work, kindly show us some support in our comments section. 🙂